 Наверх
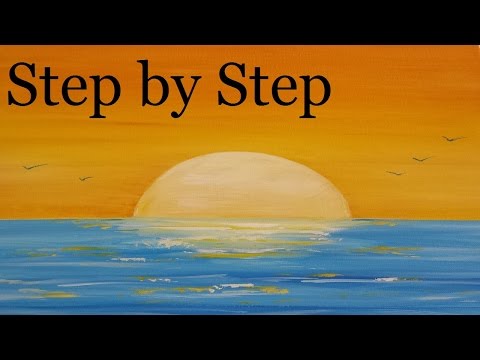
How To Paint A Sunset Step by Step – Acrylic Seascape Painting Lesson
Like our Facebook page: https://www.facebook.com/MyDrawingTut…
Come by & say "hi", ask questions, and join the community!
For more art tutorials, sign up for free here: http://mydrawingtutorials.com/acrylic
Connect With Us:
Facebook: https://www.facebook.com/MyDrawingTut…
Twitter: https://twitter.com/MyDrawingTutor
Pinterest: http://pinterest.com/mydrawingtutor/
Google+: http://mydrawingtutorials.com/googleplus
Full lesson details:
http://mydrawingtutorials.com/how-to-…
Video Transcript:
Hi, this is Adam Paol Seagram and in this lessons, you're going to learn how to paint a sunset on the ocean.
Painting Materials
For this painting, we'll be using these color paints: primary yellow, titanium white, brilliant red, and brilliant blue.
We will also be using these brushes: a Purdy house painter's brush, a small fine detail sable brush, a medium flat bristle brush, and a fan brush.
Step 1 — Establish Horizon Line & Sunset
Decide where you want to place your horizon line. In this case, we are going to put it towards the bottom 1/3 of the canvas.
It's usually a good idea to not make your painting too symmetrical (as it will look boring), so avoid putting the horizon line dead in the center.
Make your mark lightly with a pencil and a ruler.
Then use a circle template and draw in the sun. Since we already made the horizon line "off-center", it's ok to place the sun in the center.
Step 2 — Paint In Orange Sky
Create an orange color for the sky by mixing the red, yellow, and white paints.
Use the big painter's brush to put an coat of this orange in the sky area.
When getting close to the horizon line and the edge of the sun, use the edge of the brush to get more precision.
Step 3 — Fill In The Sun
Hint: Wait for the sky to dry before proceeding with this step, so you can avoid the mistake that we made (as you can see in the video).
Wet the brush a little bit by dipping it into some water to lighten the orange color we already got on there.
Then use that color to fill in the center of the sun with horizontal brush strokes.
After that, highlight the sun with some white paint along the top edge. Let the white paint blend into the orange.
This will separate the sun from the orange sky and give it some distinction.
Step 4 — Paint In Blue Ocean
For the ocean, we are going to make a blue color using a mixture of white and a little bit of blue.
The blue is a complementary color to the orange, so it will give our painting a nice contrast.
Again, use the big brush to fill in the ocean area with an even layer of blue, but leave a small area under the sun blank. We will use this space to paint in the sun's reflection in the water.
Let your painting dry fully before continuing on.
Step 5 — Put 2nd Coat On Sky
Wash out your brush and we will go back to our original sky color (which is a base of yellow with a hint of red). Put a darker shade of orange at the top of the sky to give it some contrast.
Whenever we add contrast to a painting or drawing, we give it more dimension.
Then water down your brush a little bit to lighten the color and put an even coat of orange over the sun.
After that, dip the brush in some pure white and highlight the edge of the sun again.
Step 6 — Put 2nd Coat On Ocean
Wash out your brush.
Now we are going to put on a second for the ocean using a slightly darker blue color than the first coat.
Use long horizontal brush strokes and let the brush add some unevenness to the paint. The ocean is not perfectly calm and smooth so we want to capture that movement.
Then dip your brush in a bit of white and add some light streaks of highlights into the ocean using horizontal criss-cross strokes.
Оценка информации |
Записи на схожие темы
 Connect With Us: Facebook: https://www.facebook.com/MyDrawingTut... Google+: http://mydrawingtutorials.com/googleplusPinterest: http://pinterest.com/mydrawingtutor/Twitter: https://twitter.com/MyDrawingTutor For more art tutorials, sign up for free here: http://mydrawingtutorials.com/acrylicFull lesson here:http://mydrawingtutorials.com/acrylic...Acrylic Seascape Painting Lesson (Pt 3) – Refining The Beach PaintingVideo Transcript:Hi, this is Adam...  Like our Facebook page: https://www.facebook.com/MyDrawingTut... Come by and say "hi", ask questions, and join the community!For more art tutorials, sign up for free here: http://mydrawingtutorials.com/acrylicFull Material List: http://mydrawingtutorials.com/super-s...Connect With Us: Facebook: https://www.facebook.com/MyDrawingTut... Twitter: https://twitter.com/MyDrawingTutor Pinterest: http://pinterest.com/mydrawingtutor/ Google+: http://mydrawingtutorials.com/googleplusSuper...  For more drawing tutorials, sign up for our FREE newsletter: http://mydrawingtutorials.com/acrylicConnect With Us: Facebook: https://www.facebook.com/MyDrawingTut... Google+: http://mydrawingtutorials.com/googleplusTwitter: https://twitter.com/MyDrawingTutor Pinterest: http://pinterest.com/mydrawingtutor/ Full Lesson Details:http://mydrawingtutorials.com/how-to-...Lesson Transcript:In this video we'll be talking about the use of different color...  Time Lapse Painting Demonstration Beach Sunset Acrylic Paint Video lesson.If you like to own a painting lesson on DVD here is the link: http://bensaber.com/dvds.html  How to paint the sunset on a tropical beach using acrylic on canvas by Ben Saber. This painting took 2 days to paint.More videos to come, please subscribe. Thank you How to paint the sunset on a tropical beach using acrylic on canvas by Ben Saber. This painting took 2 days to paint.More videos to come, please subscribe. Thank youPainting lessons on DVD or online on my website: http://www.artistbensaber.com/  How to paint storm clouds using "Apple Barrel" acrylic in bottles by Ben Saber.This painting took 2 days to paint.More videos to come. please subscribe. thank youPainting lessons are available on DVD or online on my website: http://www.artistbensaber.com/Free acrylic painting lesson. How to paint the sunset on a tropical beach using acrylic on canvas by Ben Saber. This painting took 2 days to paint.More videos to come, please subscribe. Thank you  For brushes download and images go to: http://idrawgirls.com/tutorials/How to draw and paint rock cliff mountain environmental background behind the character. I use Photoshop primary for video demonstration. This step by step video show you from lay down the base color, blocking in shape for painting, assigning value and color composition, and refining detail for the final concept painting. For more info and tutorial visit:Learn how to draw...  See Time lapse Video: http://www.youtube.com/watch?v=AXFZOTqRGvcHow to paint a forest at sunset using acrylics on canvas 20x24 inches.This painting lesson is available on DVD: http://bensaber.com/dvds.html  Go to http://idrawgirls.com/tutorials/2013/04/19/how-to-draw-golden-eagle/ for brushes download and imageshttp://idrawgirls.com/tutorials/2013/04/20/painting-golden-eagle-tutorial/Draw and paint Golden Eagle tutorial with Photoshop. Here I will show you how I paint golden eagle in painting video instruction along with step by step images. In this painting exercise I am trying to get translucent color effect over a detail drawing I have. It is...  http://idrawgirls.com/tutorials/2012/07/16/3-ways-avoid-muddy-color-in-digital-painting/ for step by step and brushes download.Photoshop painting tips 3 ways to smooth (blend) color and avoid muddy color and inconsistent brush stroke in digital painting. 1) Use higher opacity or thicker paint to avoid unsure color.2) Alternate between hard edge and soft edge brush to make your edges clearly define. It will also help create smooth transitions...  http://idrawgirls.com/tutorials/2011/12/12/painting-chinese-woman-portrait/ for brushes download and step by step images.How to draw female face step by stephttp://idrawgirls.com/tutorials/2011/10/19/how-to-draw-female-face/http://idrawgirls.com/tutorials/2011/10/21/draw-realistic-face-front-view/How to draw portrait with pencil (+3 hours video tutorial with explantion) go to: http://idrawgirls.com/how-to-draw-portraits.htmlHow to paint portrait...  http://idrawgirls.com/tutorials/2012/10/12/5-ways-to-pick-lighter-color-in-photoshop/Photoshop painting tips, 5 ways to find lighter color. Value or lightness varies vertically along the color solid, from black (value 0) at the bottom, to white (value 10) at the top.1) Turn the brightness (B) up toward the right side from whatever color you are using. Make sure you are using HSB sliders on color, not RGB or CMYK.2) Make a new layer on Screen...  For some great portrait drawing tutorials, sign up for free here: http://MyDrawingTutorials.com/YouTubeIf you can't find the links or resource that I refer to in the video, it's because they are posted in the original lesson. You can go watch the FULL tutorial (with everything included) here:http://mydrawingtutorials.com/how-to-draw-lips/In this video, I'm going to show you how to draw realistic mouth and lips step by step.http://mydrawingtutorials.com/...  This video will provide you with step by step abstract art video instructions on how to paint beautiful flowers, red and white roses in vase, with acrylic paint on canvas. This art video lesson is provided to you by contemporary abstract artist Peter Dranitsin from Cleveland Ohio. If you are an artist please share your artwork here: http://www.abstractartlesson.com/gallery/Please visit my websites:www.abstractartlesson.com - more of my art educational...  Making pyramids-Painting #3 Spray paint art Step by Step DVD. Get this DVD here http://www.spacepaintings.com/instructional_videos.html  How to paint a tropical beach at sunset using acrylics on canvas 20x24 inches by Ben Saber. This painting took 2 days to paint. This is the second painting of a series of tropical beach paintings in different light.More videos to come, please subscribe. Thank youPainting lessons on DVD or online on my website: http://www.artistbensaber.com/  Like our Facebook page: https://www.facebook.com/MyDrawingTut... Come by and say "hi", ask questions, and join the community!For more art tutorials, sign up for free here: http://mydrawingtutorials.com/acrylicConnect With Us: Facebook: https://www.facebook.com/MyDrawingTut... Twitter: https://twitter.com/MyDrawingTutor Pinterest: http://pinterest.com/mydrawingtutor/ Google+: http://mydrawingtutorials.com/googleplusFull lesson details:http://mydrawingtutorials.com/simple-...Video...  http://abstractartlesson.com/In this ABSTRACT ART video lesson I will share with you a step by step process in creating a landscape modern and original painting called "Three Islands", I will explain and demonstrate the tools and colors I used to create this painting. Learn how to paint and be creative.Few small details about this artwork: it is created with acrylic paint on 12x12" stretched canvas. If you'd like to buy this original...  how to color deadpool. This video tutorial shows you how to color over a deadpool drawing. Workshop and Mentorshiphttp://idrawgirls.com/private-art-les...Premium video tutorial http://idrawgirls.com/all-products.htmlI used-pencil HB-3b-Canson/Utretch sketchbook-Sketchbook Pro-PHOTOSHOP CS5 or CS6-Wacom Intuos5 Medium Pen TabletLearn how to draw and paint both traditional and digital with FREE video tutorials and step by step images from profession...  How to paint a red sunset on a tropical beach using "Apple Barrel" acrylics on canvas 20x24 inches by Ben Saber. This painting took 2 days to paint. More videos to come, please subscribe. thank youPainting lessons on DVD or online on my website: http://www.artistbensaber.com/ How to paint a red sunset on a tropical beach using "Apple Barrel" acrylics on canvas 20x24 inches by Ben Saber. This painting took 2 days to paint. More videos to come, please subscribe. thank you |


