 Наверх
Super Simple Trick To Paint Realistic Mountain Ranges — Acrylic Painting Tutorial
Like our Facebook page: https://www.facebook.com/MyDrawingTut…
Come by and say "hi", ask questions, and join the community!
For more art tutorials, sign up for free here: http://mydrawingtutorials.com/acrylic
Full Material List:
http://mydrawingtutorials.com/super-s…
Connect With Us:
Facebook: https://www.facebook.com/MyDrawingTut…
Twitter: https://twitter.com/MyDrawingTutor
Pinterest: http://pinterest.com/mydrawingtutor/
Google+: http://mydrawingtutorials.com/googleplus
Super Simple Trick To Paint Realistic Mountain Ranges — Acrylic Painting Tutorial
Video Transcript:
So if you never painting before, it can seem a little complicated and intimidating. But I want to show you that if you know the right method and procedure, painting can actually be easier than drawing!
In this lesson, you’re going to learn how to use a really simple painting technique to create realistic looking mountain ranges.
Painting Materials
All you’re going to need for this tutorial is…
– a palette knife
– black, white, blue, and red paint
– and some light molding paste (optional) (The light molding paste used in the lesson is from an acrylic medium package by Golden Artist Colors.)
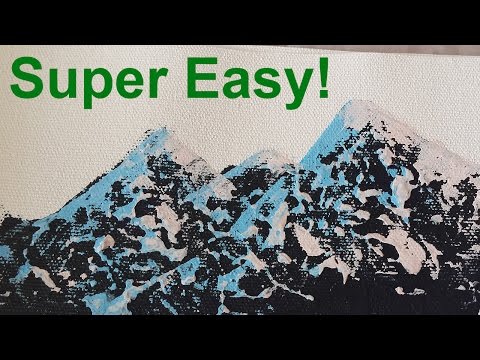
Step 1 – Create Rocky Texture
The first step is to mix some black acrylic paint with some light molding paste to create a thick mixture that we can use to create some rough texture.
Then load this thicker mixture onto your palette knife and use it to fill out the foundation of our mountains. You’ll want to lay on a lot of paint and make it really thick.
Once you have the overall shape, use your palette knife to create a lot of bumps in the paint. The point is to create a really rough texture to mimic the jagged surface of the mountains.
Now, make sure to let the paint dry completely before going on to the next step. Because we put on a lot of paint, this can take a while (1 – 2 hours) so be patient.
Step 2 – Putting in the Cool-Color Snow
We are going to put on a blue-ish layer of snow on the shaded side of the mountain (left).
Mix a little bit of blue paint with a lot of white paint to create a light blue mixture. Then load some of it on your palette knife and scrap it across the left side of the mountain ranges.
Keep your pressure light and just let the palette knife glide over the bumps. We want to get a “hit and miss” effect with the paint.
Step 3 – Putting in the Warm-Color Snow
Now we are going to do the same thing for the other side of the mountains. Except this time, we will be using a warm color.
Mix a little bit of red with a lot of white paint to create a light pink color. Then load it on your palette knife and drag it across the right side of the mountains.
Once again, keep a light touch in order to not fill in all the gaps and achieve that “hit and miss” effect.
And that’s it, you’re all done!
(You may notice that this mountain range looks slightly different from the one at the very beginning of this lesson. This is due to the fact that I used a different type of paper.
For the image at the top of the post, I used a rougher texture acrylic painting canvas. This allowed the paint to grip the surface more and created more texture.
In the painting in the video, I used a much smoother watercolor paper. This caused the painting to not have as much texture and resulted (I think) in a less realistic painting.
So just as a head’s up, you’ll want to use proper acrylic painting paper for this exercise and avoid smooth papers.)
Оценка информации |
Записи на схожие темы
 Like our Facebook page: https://www.facebook.com/MyDrawingTut... Come by and say "hi", ask questions, and join the community!For more art tutorials, sign up for free here: http://mydrawingtutorials.com/acrylicConnect With Us: Facebook: https://www.facebook.com/MyDrawingTut... Twitter: https://twitter.com/MyDrawingTutor Pinterest: http://pinterest.com/mydrawingtutor/ Google+: http://mydrawingtutorials.com/googleplusHow To Paint Clouds - Acrylic...  Connect With Us: Facebook: https://www.facebook.com/MyDrawingTut... Google+: http://mydrawingtutorials.com/googleplusPinterest: http://pinterest.com/mydrawingtutor/Twitter: https://twitter.com/MyDrawingTutor For more art tutorials, sign up for free here: http://mydrawingtutorials.com/acrylicHow To Paint Clouds - Acrylic Painting For Beginners  Like our Facebook page: https://www.facebook.com/MyDrawingTut... Come by and say "hi", ask questions, and join the community!For more art tutorials, sign up for free here: http://mydrawingtutorials.com/acrylicConnect With Us: Facebook: https://www.facebook.com/MyDrawingTut... Twitter: https://twitter.com/MyDrawingTutor Pinterest: http://pinterest.com/mydrawingtutor/ Google+: http://mydrawingtutorials.com/googleplusFull lesson details:http://mydrawingtutorials.com/simple-...Video...  Connect With Us: Facebook: https://www.facebook.com/MyDrawingTut... Google+: http://mydrawingtutorials.com/googleplusPinterest: http://pinterest.com/mydrawingtutor/Twitter: https://twitter.com/MyDrawingTutor For more art tutorials, sign up for free here: http://mydrawingtutorials.com/acrylicMore at lessons at http://mydrawingtutorials.com/Oil Painting - How To Paint A Moon  Connect With Us: Facebook: https://www.facebook.com/MyDrawingTut... Google+: http://mydrawingtutorials.com/googleplusPinterest: http://pinterest.com/mydrawingtutor/Twitter: https://twitter.com/MyDrawingTutor For more art tutorials, sign up for free here: http://mydrawingtutorials.com/acrylicHow To Paint A Tree In Acrylic Paint  For more drawing tutorials, sign up for our FREE newsletter: http://mydrawingtutorials.com/acrylicConnect With Us: Facebook: https://www.facebook.com/MyDrawingTut... Google+: http://mydrawingtutorials.com/googleplusTwitter: https://twitter.com/MyDrawingTutor Pinterest: http://pinterest.com/mydrawingtutor/ Full Lesson Details:http://mydrawingtutorials.com/paintin...  Connect With Us: Facebook: https://www.facebook.com/MyDrawingTut... Google+: http://mydrawingtutorials.com/googleplusPinterest: http://pinterest.com/mydrawingtutor/Twitter: https://twitter.com/MyDrawingTutor For more art tutorials, sign up for free here: http://mydrawingtutorials.com/acrylicFull lesson here:http://mydrawingtutorials.com/acrylic...Acrylic Seascape Painting Lesson (Pt 3) – Refining The Beach PaintingVideo Transcript:Hi, this is Adam...  Connect With Us: Facebook: https://www.facebook.com/MyDrawingTut... Google+: http://mydrawingtutorials.com/googleplusPinterest: http://pinterest.com/mydrawingtutor/Twitter: https://twitter.com/MyDrawingTutor For more art tutorials, sign up for free here: http://mydrawingtutorials.com/acrylicHow To Paint An Apple Still Life In Acrylic Paint  To win a $20 Amazon gift card AND the signed drawing in this video, all you have to do is SHARE & LIKE this Facebook post:http://mydrawingtutorials.com/giveawayI'll randomly select a winner on 12/04/2015 (DEADLINE) so be sure to get your entry in by then!For more drawing tutorials, sign up for our FREE newsletter: http://mydrawingtutorials.com/portraitConnect With Us: Facebook: https://www.facebook.com/MyDrawingTut... Google+: http://mydrawingtutorials.com/googleplusTwitter:...  Like our Facebook page: https://www.facebook.com/MyDrawingTut... Come by & say "hi", ask questions, and join the community!For more art tutorials, sign up for free here: http://mydrawingtutorials.com/acrylicConnect With Us: Facebook: https://www.facebook.com/MyDrawingTut... Twitter: https://twitter.com/MyDrawingTutor Pinterest: http://pinterest.com/mydrawingtutor/ Google+: http://mydrawingtutorials.com/googleplusFull lesson details:http://mydrawingtutorials.com/how-to-...Video...  Next video: http://www.youtube.com/watch?v=s8JA_zCsvBYPrevious video: http://www.youtube.com/watch?v=6TMOZW469IoHow to paint mountain glaciers with acrylics on canvas high speed painting,I also sell DVDs on my website so you can paint along while watching me on your big screen TV and without having to wait for downloads. You will be able to fast forward and replay instantly without commercials. Here is the link: http://bensaber.com/dvds.html  For some great portrait drawing tutorials, sign up for free here: http://MyDrawingTutorials.com/YouTubeIf you can't find the links or resource that I refer to in the video, it's because they are posted in the original lesson. You can go watch the FULL tutorial (with everything included) here:http://mydrawingtutorials.com/hard-edge-vs-soft-edge/In this video, I'm going to show you some simple tip and technique to help you draw better...  For more drawing tutorials, sign up for our FREE newsletter: http://mydrawingtutorials.com/acrylicConnect With Us: Facebook: https://www.facebook.com/MyDrawingTut... Google+: http://mydrawingtutorials.com/googleplusTwitter: https://twitter.com/MyDrawingTutor Pinterest: http://pinterest.com/mydrawingtutor/ Full Lesson Details:http://mydrawingtutorials.com/how-to-...Lesson Transcript:In this video we'll be talking about the use of different color...  How to paint a mountain, snow, glaciers, lake and evergreen tree with Liquitex acrylic on canvas 18x24 inches by Ben Saber. This painting took 2 days to paint.More videos to come, please subscribe. Thank you  For more drawing tutorials, sign up for our FREE newsletter: http://mydrawingtutorials.com/basicsConnect With Us: Facebook: https://www.facebook.com/MyDrawingTut... Google+: http://mydrawingtutorials.com/googleplusTwitter: https://twitter.com/MyDrawingTutor Pinterest: http://pinterest.com/mydrawingtutor/ Full Lesson Details:http://mydrawingtutorials.com/how-to-...Music: "Carefree"Kevin MacLeod (http://incompetech.com)Licensed under Creative...  For some great portrait drawing tutorials, sign up for free here: http://MyDrawingTutorials.com/YouTubeHere's the link to the reference photo if you'd like to draw along:http://mydrawingtutorials.com/wp-content/uploads/2012/10/Blonde-Hair-Big.jpgAlso, if you like this video and want to learn more about how to draw all sort of different hair, including facial hair, baby hair, braided hair, curly hair, and so much more.You can learn more...  Simple and creative way to paint a black and white cityscape painting with acrylic paint on canvaswatch more videos: http://abstractartlesson.com How to paint a mountain, snow, glaciers, lake and evergreen trees (Mt Shuksan in Washington State) with Liquitex acrylic on canvas 18x24 inches by Ben Saber. This painting took 2 days to paint.More videos to come, please subscribe. Thank youPainting lessons on DVD or online on my website: http://www.artistbensaber.com/ How to paint a mountain, snow, glaciers, lake and evergreen tree with Liquitex acrylic on canvas 18x24 inches by Ben Saber. This painting took 2 days to paint.More videos to come, please subscribe. Thank you  How to paint a mountain cabin in the snow that could be used for making a Christmas card using acrylics on canvas board 11x14 inches. This painting took 2 hours to paint. Once scanned the image was printed on card stock and mailed for Christmas.More videos to come, please subscribe. Thank youPainting lessons on DVD or online on my website: http://www.artistbensaber.com/Free acrylic painting lesson.  See this video in time lapse: http://www.youtube.com/watch?v=iGNyZqWRYTcNext Video: http://www.youtube.com/watch?v=xStiBBFmG7wHow to paint a Mountain glaciers (Mt Mackinley in Denali National Park Alaska) with acrylics on canvasThis painting lesson is also available on DVD http://bensaber.com/dvds.html  To win a $20 Amazon gift card, all you have to do is SHARE & LIKE this Facebook post:http://mydrawingtutorials.com/giveawayI’ll randomly select a winner on 01/29/2016 (DEADLINE) so be sure to get your entry in by then!For more drawing tutorials, sign up for our FREE newsletter: http://mydrawingtutorials.com/basicsConnect With Us: Facebook: https://www.facebook.com/MyDrawingTut... Google+: http://mydrawingtutorials.com/googleplusTwitter: https://twitter.com/MyDrawingTutor...  This is a sample video of my full-length tutorial Mountain Falls visit https://www.tvpainter.com/mountain-falls to get the tutorial or to purchase the painting visit https://mthompsonstudio.com thank you for watching my videos.  Painting figures set up light and shadow with different poses preview.Download full tutorial here http://idrawgirls.com/how-to-paint-fi...Workshop and Mentorshiphttp://idrawgirls.com/private-art-les...Premium video tutorial http://idrawgirls.com/all-products.htmlI used-pencil HB-3b-Canson/Utretch sketchbook-Sketchbook Pro-PHOTOSHOP CS5 or CS6-Wacom Intuos5 Medium Pen TabletLearn how to draw and paint both traditional and digital with FREE video tutorials...  How i draw a realistic vampire eye.. RED..Instagram : http://www.instagram.com/tutodrawSupport & News FB : http://www.facebook.com/TutoDrawOutils / Tools : Pencil, pastel, promarker, paint, Web Site : http://www.tutodraw.com Music by Kevin Macleodcreative commons 3.0How to draw realistic vampire eye! |


